Sunday, September 8, 2013

Granny Square Crochet for my Daughter


Granny Square Crochet
I've always loved the look of a Granny square blanket. I'm not sure if it is the Granny square crochet pattern that intrigues me or the combination of colours that inspires me. Whatever the reason my Crochet Pinterest board seems to be full of Granny Square crochet patterns.

Since my eldest daughter "has flown the coop", I have felt compelled to make her things. I am assuming that this is normal. Those of you who are regular readers will have already read about the new curtains, matching cushions and crochet edged blanket that I made just recently.Yet still my fingers were itching for something a bit more challenging, so I was thrilled when she showed a keen interest in some of my Granny square crochet finds.One pattern in particular caught her eye, which was found on Ravelry.

So I was off to the local wool shop to gather supplies. Here are some of the colours I chose.

wool balls for Granny square crochet
Once I had the pattern in hand I launched in. Despite the easy rating on the pattern I had some problems. My first attempt turned into a mat for my younger daughter's dolls house and the second was refashioned into a groovy headband. Clearly I was going wrong somewhere...and then it dawned on me. The pattern was an American pattern and I had been taught to crochet the British way. Those of you who crochet will understand the difference. If not check out my article on the Stitching Cow blog that includes a handy chart of the crochet stitch terminology used. Click here for British and American Crochet Terms

Once I had this sorted I was away and my Granny square crochet pile started to grow. I am also very pleased to report that my youngest daughter has taken it upon herself to sew in all the loose ends. This is the perfect arrangement.I crochet the Granny square, pass it to Miss 13 and she secures the ends. What could be better?

our pile of crocheted Granny squares
As we sit side by side on the lounge of an evening, I try not to think about the day when she too shall spread her wings and go. For now we are both enjoying creating something wonderful and I can highly recommend the humble Granny square as the perfect crochet therapy!

Warmly Lenna


Monday, August 26, 2013

Crocheted Edge Blanket - Retro style

Just recently while sorting through some things in the attic, I came across a length of wool fabric. I had bought the fabric and a collection of sewing bits and pieces from a lady who was moving into a retirement home a few years ago, some of you may remember my blog post about it "A Pleasant Surprise".

The wool fabric had appealed to me because it had a retro feel to it, and at the time I thought that it would make a great picnic blanket. Five years on it sat sadly in a box, begging to see the light of day.I tossed it down the attic stairs and vowed to do something with it.

I am pleased to say that an idea came quite quickly. My eldest daughter (who has now moved out of home) has just moved into a 1940's style house and in keeping with the house she has decided to decorate in the same style. Being a "poor struggling university student) all donations of homely goods have been received gratefully. Some newly made retro style kitchen curtains and some matching cushions from Mum were particularly well received.So I knew I would be on a winner if I made her a crocheted edged blanket to snuggle under of an evening.

The surprising part was how quickly the project came together. I doubled over the fabric and sewed around the raw edges using a walking foot on my sewing machine, an opening was left for turning through. I then worked a base row and picked out a suitable crochet edge from an old book that had belonged to my Grandmother. After three nights of crocheting the blanket was finished and presented to my excited daughter.


Five long years this wool fabric had been stashed away in my attic and I am thrilled to see it now draped over a lounge chair in my daughter's home. I am sure that the previous owner would be thrilled as well!

Warmly Lenna

Wednesday, August 21, 2013

Exciting News

It has been so long since I have posted here that I feel I must explain. Truth is I have been busy working on two exciting new projects. The first has been a total revamp of my Stitching Cow website, which had become too large for the old system I had been using. Those far more technically minded than me convinced me it was time for an upgrade, and while I knew they were right, another part of me understood only too well the amount of time it would take. As they themselves put it "the ball of string at my end was quite long!"

The good news however is that the new website is now up and running and has been very well received. It has some new features, the most exciting being a range of handcrafted timber sewing products which are exclusive to the website. They have been custom made by my father, who takes great pride in his workmanship. I convinced him to make some items for me and I was delighted with what he came up with. You can check them out by clicking here.

Handcrafted timber darning mushroom at Stitching Cow

Small timber button scoop
I have also included a shop section that includes some fabric goodies for you to enjoy and a streamlined shopping cart which is much easier to navigate. Check out the new website for Stitching Cow here

Cupcake of quilting fabric fat eights
My other project is still under wraps but I can tell you that I have been working with Apple on developing something wonderful for the Apple Ipad. Months in the planning and design it is very soon to be released and I will be sure to let you know when you can check it out.

Having shared all my news, I hope you will forgive me for not having posted here for so long. Promise I will write again soon and include some pics of a crocheted project I have just started for my eldest daughter who has just moved out of home.
Warmly Lenna

Thursday, April 18, 2013

Yoko Saito project and book

Project Designs by Yoko Saito

Yoko Saito is my all time favourite designer. I remember seeing a small advertisement for one of her amazing bag designs in Quilt Mania magazine and from that point onwards I was hooked!

Since that day I have been collecting Yoho Saito's books. Unfortunately for me, most of her books have been published in Japanese or French, however this has not deterred me in the slightest. I am still able to ponder over the photos of her exquisite designs which continually inspire me.

One of the qualities that I admire so much about Yoko's work is that many of her projects are worked by hand. Yoko's designs often combine needle turn applique, hand embroidery, hand piecing and of course hand quilting. She is an amazing talent.

Over the Easter break I decided that it was about time that I stopped just admiring, it was time to pick up needle and thread myself and attempt one of her projects.I selected a small bag project from the book Motifs de Patchwork. This book by Yoko Saito includes 156 blocks and a variety of ideas for incorporating them into stunning projects.


This is the project I selected from the book. If you look closely you will notice that the front section is made up of four blocks. Each block is only 4" (10cm) in size and all those little pieces are hand pieced.


 I have to confess that I spent the whole day piecing just one block which I had to undo numerous times. It is difficult to appreciate just how small those template pieces are, which is why I placed a pin next to them. Those little tiny triangles are the ones that caused me the most grief, they are half of a quarter!


Eventually I got the first block together which is far from perfect. Each shape is sewn together using a small running stitch. Three blocks to go and I will have the front panel complete. Then I will begin work on the side panels which are hand quilted in a cross hatch pattern. The front panel is also hand quilted so I have much to do!


I'll let you know when I get it done. Wish me luck!
If you are interested in books by Yoko Saito, here is one of the few written in English.
Click here for Yoko Saito book

Warmly Lenna

Sunday, March 17, 2013

Best Tomato Relish Recipe


How lucky was I this week to receive a wonderful bounty of home grown onions and tomatoes, this meant one one thing, a batch of Tomato Relish!

This year I thought I would do some research on my ipad and find  a new Tomato relish recipe. I'm so glad that I did because I found an easy recipe that I think has become a new family favourite. It is different to my usual recipe in that it combines grated apple, red wine vinegar and a combination of spices including All Spice. The recipe can be found on the Taste.com website

I multiplied the recipe by 4, which made 5 large jars. The fresh Thyme stirred through at the end was also a nice touch. Luckily I had an abundant supply in the herb patch.


Hope you enjoy this recipe too, I think it is the best Tomato Relish recipe that I have come across.
Warmly Lenna

Wednesday, March 13, 2013

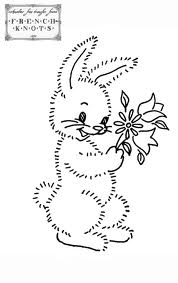
Little Felt Bunny and Free Bunny Embroidery Patterns

Last night I felt like making something, I had the sewing bug! With Easter only a few weeks away I decided to make a little felt bunny. Before starting I also did some research for some free bunny embroidery patterns to share with you, which I have included below. But first meet my little gray bunny.

 I Saw a Little Bunny

I saw a little bunny
going hop, hop, hop.
I said, "Please, Mr. Bunny,
won't you stop, stop, stop."
He flapped his big, long ears
and had no word to say,
And before I could get near him
he had hop, hop, hopped away!
Author unknown


I had  a delightful time photographing him for you, here he is looking a bit cheeky!


 I always find it amusing how toys take on a personality all of there own. Miss 12 usually names my little creations but she is not home from school yet, so he will have to remain nameless unless you can think of a name for him.

My little felt bunny is hand sewn from wool felt, he has two small seed beads for eyes and I added two small buttons and a soft green ribbon. Choosing from my ribbon stash was difficult (yes I know it is untidy) and I have to confess that my little felt bunny tried on a few ribbons before we decided on one.


Little felt bunny only entered this world last night so I have not written a pattern for him. Let me know if he is something you would like to make, if I get enough interest I will write the pattern for you.

If you too would like to do some stitching coming up to Easter, here are some free bunny embroidery patterns finds for you:

Click each link to go to the website so you can print off the pattern.

Free bunny embroidery design by Badbirds

Free bunny embroidery pattern by About.com

Free bunny embroidery pattern by French Knots


Hope that you find these free bunny embroidery patterns useful and that you enjoyed seeing my little felt bunny. What should we name him and should I write the pattern so you can make one too?

Warmly Lenna

PS Good news, due to popular request I did decide to write the  pattern for my little felt bunny, it can be found here
 http://stitchingcow.com/collections/felt-projects/products/flopsy-bunny

Wednesday, March 6, 2013

Wall Quilt for Lansdowne Crescent Primary School, Hobart Tasmania

Last year my youngest daughter finished what has been a long chapter in out family's history at primary school. Over a period of 15 years hubby and I have been apart of a wonderful experience as our three children progressed their way through junior school. As all parents know being apart of a school community involves many activities, including fetes, fund raiser evenings, music events, excursions, school assemblies...the list goes on and on.We have enjoyed them all.

With this in mind, and sensing that an important chapter was coming to a close, I felt that I wanted to leave  Lansdowne Crescent Primary school with a parting gift of some sort. The opportunity presented itself when a brand new hall was built at the school, and the idea of a large wall quilt to decorate one of the walls was hatched.

The idea was eagerly adopted by my daughter's grade 6 teacher, a kindred soul at heart who also enjoys creative pursuits. So it was decided that the whole class would be involved from conception to completion. It was also decided that the wall quilt would depict the scene that the children see looking down from their school playground onto the city and harbour below.

After photographing the view, an initial design was sketched and then a team of children and myself painted the scene onto calico.Here it is pegged to the trampoline, the rough sketch is taped to the bottom for  our reference.


Our next task was to get the kids to sketch some of the buildings and boats that they could see from their playground. Their sketches were then reduced or increased to size and then attached to the scene using fusible webbing. A local curtain making and upholstering shop had kindly donated a collection of fabric sample books to the school, these were perfect for the project at hand. From these the children chose suitable fabric colours for the buildings and foreground vegetation.

Over the next few weeks teams of sewers sat and hand appliqued the houses, buildings, boats and leaves in place. Rows of quilting were added for the waves and smaller details like the town clock and flag were hand embroidered. Here are some close up sections of the wall quilt.


These grade 6 children did an amazing job. The project was a wonderful journey for all involved and now proudly hangs in the school hall.


Miss 12 and I were responsible for hanging the wall quilt. After a few times up and down the ladder we were both satisfied that it was straight and sturdy. As we proudly looked up at the wall quilt now in its final resting place, we reflected on the journey that had been taken. It had involved so many little hands, much laughter and lots of wonderful, creative energy.


As my daughter and I walked away from the school a tear slipped down my cheek as I closed that chapter and began contemplating the next.

Warmly Lenna


LinkWithin

Related Posts with Thumbnails